Posted on

Shooting Ballet

L1035364
Olga Pavlova bowing to the audience after performing “Dying Swan”.
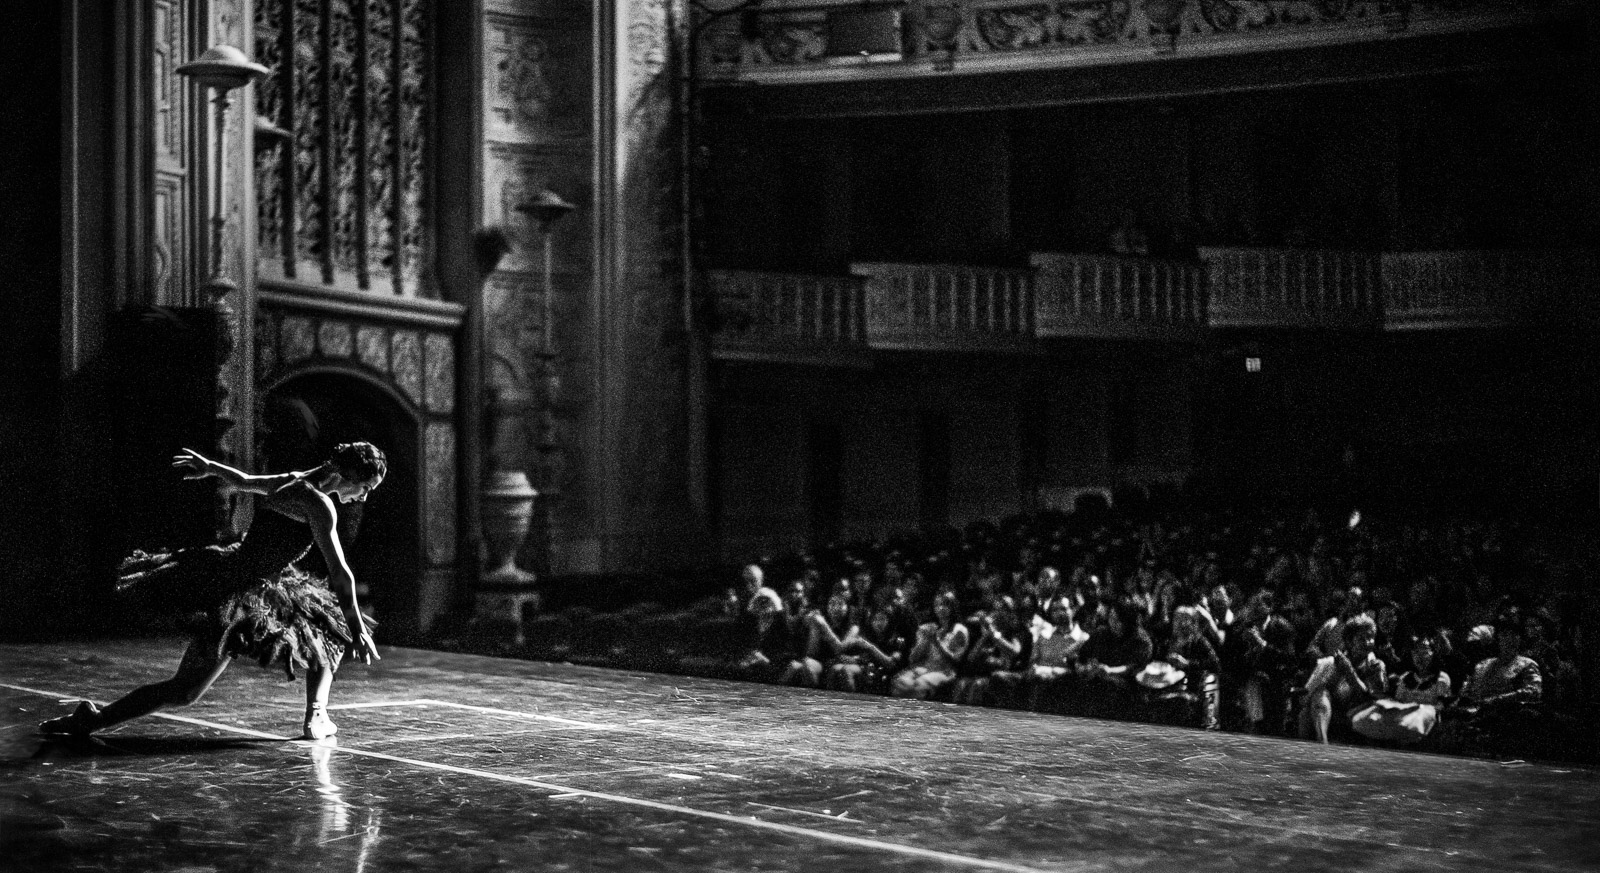
Detroit Opera House, 2015
Leica M9, Leica Noctilux 50mm f/1

I have been working with classical dancers for a few years and learned quite a few things that you might find very useful. Like, for instance, how to get a shot like the one below. At first it may seem unthinkable: getting on stage during a live full-house performance is not something that photographers can do casually. That is, if you do not know how to be invisible.

What you should always remember while doing this type of work is that people did not come to the theater to look at you. So, for them to do it, you need to do something that makes you noticed. For example, get in a spot light, or stand between an audience and a dancer. As magicians say, it is all about misdirection: while people are busy looking at what they paid to look at, you can accomplish a lot, provided you do not do anything making you noticeable, like fast abrupt movements, loud sounds and, as mentioned before, making yourself visible.

Observing the audience from back stage, you will notice how eyes of every single person look in the same direction. If you manage to be where the line of the audience’s sight is not, chances are, nobody will see you. You can make these chances even slimmer by dressing in black and, what is just as important, wearing a black baseball cap, which will cover your head and parts of the face not hidden behind a camera.

Obviously, carrying a big lens is not a good idea, especially the one painted fashionable off-white, or ivory. Back in a day pretty much the only viable option for this type of work was Leica M, which I still use, due to  silent focusing, small size of lenses and a remarkably quiet shutter. Now, with advent of mirrorless digital cameras, options are plenty. Sony a7R II and even more so a7S paired with an excellent Zeiss 1.8/55, or Leica Summilux 1.4/50 is all you need. Remember, it is not the power of your telephoto lens, but how close you are, that makes a successful shot. That is why you need to know how to be invisible: to get as close as you can without disrupting the performance.

Posted on

Low light? No light? No problem!

Picture
Leica M9 • Carl Zeiss Distagon 1.4/35 T* ZM
Tango is beautiful. Elegant, classy and sensual. Also it is exceptionally difficult to photograph. If someone tells you that it is not, think twice before believing.
First, dancers do not wait for you to take a picture.
Second, they almost never turn both faces to you at the same time, and when they do, they tend to cover them with their arms.
But most of all, it is dark in there. Subversive world of Tango exists on a thin border between light and dark, and the easiest way to destroy its magic is to crank light dimmers all the way up.
Picture
Leica M9 • Leica Noctilux 1/50
So, if you are planning to shoot tangeros in action, brace yourself, but do not get discouraged. It is not all that hard if you learn some basic laws and tricks. Laws first:
  1. No flash. I mean, no flash, forget it, leave it somewhere, do not even bring it with you. Flash will ruin everything. Even without mentioning what it will do to delicate lighting patterns already in place, just imagine being in bed with your loved one, and one of a sudden someone enters a room, turns lights on and starts cleaning up, for instance. How would you feel? This is how dancers would feel under your speedlight.
  2. No tripod. Naturally, in low light and no flash you might want to stabilize your camera somehow, and the tripod is the first thing to think about. In this instance, however, the most evident solution is not the best. The tripod will severely limit your mobility, and dancers will have one more thing on which to trip.
  3. No bumping into dancers. Be aware of your surroundings. Remember that it is all about the dancers, not about you.
Picture
Leica M9 • Leica Noctilux 1/50

Now, the tricks:

First and foremost, before even getting to the trick list… Low light photography with an SLR camera is a losing proposition. Even with the fastest lens, autofocus will be hunting and hunting, and hunting… When it finds something to focus on, most likely it will not be what you wanted to be in focus. However, it is not really going to matter at that point because whatever you will have wanted to take a picture of would be gone by then. This is the reason Leica M is a weapon of choice here. Its viewfinder is always bright and if there is a slightest possibility to see a difference between a single and a  double image, you can focus it, especially against the light. Manually focusing an SLR equipped with just a matte screen is impossible in low light, as you have to use small details for focusing, and it is too dark to figure out how sharp they look. Your getting a focusing screen with a split-image rangefinder for your SLR is something that I would personally enjoy watching.

Picture
Leica M9 • Car Zeiss Distagon 1.4/35 T* ZM

Another advantage of Leica M design is that since there is no mirror, there is no mirror shake. It is especially important on shutter speeds between 1/10 and 1/30 sec. Motion blur can be used to convey speed, but camera shake usually just ruins the shot. With Leica M it is very much possible to successfully handhold it at 1/15 of a second with a 50mm lens.

Now, back to the bag of tricks…

  1. Forget about B&W. Tango is a dance of passion. Passion is not black and white, it is vivid.
  2. Use a fast lens. By fast I mean as fast as you can afford. This may sound discouraging for zoom lovers, as there is no zoom lens in existence, which is fast enough.
  3. Shooting wide open do not get too close, or depth of field will be too shallow to get both dancers in focus. That is, of course, if you want both dancers in focus.
  4. Shoot from below. DO NOT shoot from above dancers’ eye level, or you will end up with huge heads and short legs. Using the low vantage point, however, will do the opposite: legs will look longer making poses more elegant.
  5. Shooting from below keep both eyes open. If you don’t, somebody will inevitably step on you. The best pictures usually come out from normal, or moderately wide lenses, hence a need to get right in there. Dancers often keep their eyes closed to synchronize their breathing with a partner. They remember the dance floor by the number of steps on its perimeter, so there is no need to look around. It is your responsibility to see what’s going on, not theirs.
  6. Yes, you can stop down. You can stop down all the way to f/11 and come up with some fascinating panning shots. There is a lot of literature on panning techniques, just google it.
Picture
Leica M9 • Leica Noctilux 1/50
Now you know everything. Just find an Argentine Tango studio nearby and get friendly with those people. Good luck! 🙂
Posted on

Leica M9 in commercial photography

PicturePublished: Detroit Free Press March 6th 2012

Yesterday I had, what our producer described, “a quick shoot”. This is a euphemism for a low-budget assignment. It also means that bringing studio lighting to a client would be an overkill. Well… Actually, in 2009 it would not be an overkill, because Leica M9 did not exist yet, and would have been forced to appear, like a real photographer, with a medium format rig. That includes, among other things, a Delsey airline-compliant roll-away trunk and an airline non-compliant case with two Broncolor Minipuls D160 flashes and a cumbersome bag with three heavy-duty light stands. Did I forget anything? Oh, yes, of course: a Gitzo G320 heavy-duty tripod.

Fortunately, now is 2011, Leica M9 exists, and I carry it in a toy-size camera bag. So, I grabbed the bag and a Gitzo 12-series carbon-fiber tripod, and off I went. In the bag I had three lenses: Noctilux 1/50, Tri-Elmar 4/28-35-50 and  Summilux 1.4/35 pre-ASPH, which I added after some hesitation, just in case.

For a portrait of an owner I had to come up with a way to make the background relevant, yet not too powerful. Noctilux was an obvious choice.


Picture

For a portrait of a chef, who was working on some intricate pastries, 50mm would be too long, but 35mm was just fine. I had to shoot it with the 1.4/35, but for a reason different from the first photo. This time it was just too dark for anything slower than f/1.4. Not that I could not handhold my camera at 1.15 of a second, rather, at such a long shutter speed the chef would be all blurred out, as he was moving swiftly left and right. Lovely bokeh was just an added benefit.


For the last shot Tri-Elmar was ideal. The lens had to be stopped down anyway, and I just had to pick one, which would render specular highlights on wine glasses as stars.

Everything was done handheld, without any added lighting. In a point-and-shoot kind of way. Thanks to modern technology (I mean, I downloaded pictures to my MacBook Pro, picked these three shots, cropped the last one and had them displayed in all 16-bit grandeur), the client had an opportunity to shake off his suspicions of my non-professionalism almost before they were born.

Then we had a five-minute-long “weather talk”, I picked up my toy camera bag and a useless tripod, and waved everybody goodbye. No roller bags, no flashes, no assistant… Go Leica! 🙂

Picture
Posted on

Leica S2 Against Megapixel Arms Race

It’s been my more or less firm opinion since I had Contax N Digital for my main digital SLR: even though formal resolution of a digital camera is important, there are factors that equally contribute to the resulting effective image quality. What I mean is, NORMAL PEOPLE never assess an image by looking at it at 1:1 magnification on a computer monitor from a distance of one foot. Photographers often forget this simple fact and become victims of a malignant habit of pixel peeping.

In reality, high-quality images are usually printed in magazines, or displayed as prints. In either case, the distance from which it is convenient to look at prevents from burrowing into tiny details and favors overall impression, or, as some prefer to say “look and feel”. The only notable exception to the rule is a medium called a light box. You see a lot of them in jewelry stores, for instance. A large (sometimes very large) print made on transparent film is backlit against a white diffusion panel. In many instances, a 4×6′ blow-up of a macro shot is right in the client traffic area, and one can look at it from a very close distance. It certainly imposes much more stringent requirements on image quality. Now, after all this being said, I can reveal a terrible secret: most of my work done for light box presentation was shot in 2005-2007 with a 16-megapixel 37x37mm Kodak ProBack 645C. Like this one below:

Grisogono
Contax 645AF • Kodak ProBack 645C

I can assure you that a good lens, a firm tripod and literacy in lighting techniques mean way more than the number of pixels in a digital back of your camera.

Working in simultaneously with Contax N Digital and  the Contax 645AF/Kodak ProBack setup I came to an even more sobering revelation: physical size of a digital sensor (not the resolution) is obviously important to the image visual properties, but the dependence is non-linear. First, its “the bigger, the better”. Then, when it surpasses the 35mm frame size, the law of diminishing returns takes over. Essentially, when the sensor size is more than two times larger than 24x36mm, it does not really matter how big it is in practical applications.

Recently I spent some quality time evaluate Leica S2. The 1.3 crop-factor puts it into a so-called sub-medium format category. When it comes to image quality, however, it appears to be in a class of its own. I was very curious,  how it will stand up to a PhaseOne/Leaf Aptus 12 setup, which sports 60 megapixels on a full 645 frame. If you are shopping (or contemplating to be shopping) for a digital medium format camera, my findings will almost change your life 🙂


Picture